Friday, November 8, 2013

So You Want to Be a Zombie

BRAAAAAAAINS!
We had our second annual Zombie Day at the library last weekend, and it was awesome - we had about twice as many people as we did last year!  The first year we did a Zombie Day, I hired a makeup artist to turn us undead, but this year, I decided we could learn to do it ourselves.  I'm so glad we did!  Our artist was wonderful, but that was money we could spend on other things.

So! In case you missed Zombie Day, or have heard about it and wish you could have been there, I've drawn up a quick tutorial on how to turn yourself into a zombie.  I'm using my own face and hands as a tutorial, so please forgive the zombie selfie photos.

First, the supplies:
We had white, green, and black cream makeup; fake blood; liquid latex; toilet paper (to use with the latex); and LOTS of sponges.  We also had small paper plates, so each person could have their own supply of makeup, for sanitary reasons.

To apply a glamorous undead look, first mix up some makeup.  Using mostly white, with dabs of green and black, make a lovely disgusting color.  I found that it looked more realistic if the makeup was somewhat mottled, so try to not mix it all the way, and give it a marbleized look.
Give yourself a nice, even coating of a pale, sickly color, anywhere you would like to apply makeup - face, hands, knees if they stick through the holes in your jeans, whatever.  Try to get at least part of your neck, or else the makeup will look just like a mask.

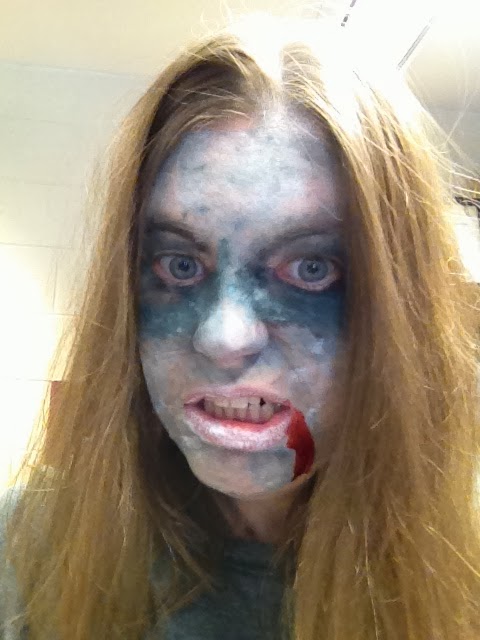
Yes, this is me. Don't I look excited?!
My makeup ended up a fair bit more caked-on than that, but you get the idea. Try to get your lips, too, if your makeup is safe for that (it says on the tube).

Next, add a bit more green and black to your makeup to make a darker color, and dab it around your eyes, to make them look sunken in.  Solid colors and absolute shapes aren't necessary - no realistic zombie would have a perfect circle of black around their eyes. 
You can add some dark spots to cheekbones or for bruises, as well.  Add blood (with sponges! Blood stains clothing!) to your mouth or anywhere else you feel like bleeding.  I had it coming out of one ear and dripping down from my mouth. Then, mess up your hair - maybe sprinkle some talcum powder in to make it ashen.  And, voila!
   
Same photo as above, I know.  
Now, let's say that you want to  be the type of zombie that has gaping wounds.  That will require liquid latex.

The first thing you do - ALWAYS - is a test patch.  Put a little bit of latex on your hand or somewhere else that's easy to wash off, and make sure that you're not itching or burning.  If  it dries and you are uncomfortable, DO NOT USE THE LATEX! You might be allergic! Even if you've never been allergic to latex before, it is always a good idea to test any new product to see how it makes you feel, just in case. If you can't use latex, you can follow the rest of the directions using school glue; it won't be exactly the same, but it'll be similar.

Once you've tested, it's time to get started!  First, pick where you would like the wound to be. 
Even with little dabs of makeup, my hand is rather boring, wouldn't you say?  Let's make one here. 

Add a layer of liquid latex to your hand (or wherever), and then add some toilet paper to the top of it.  You can scrunch it up or lay it relatively flat (as I did here).  Put more latex on top of the toilet paper, until the whole thing is wet, and make sure it's evenly stuck to you on all sides.

The red is fake blood.  Fake, I swear!
Let it dry.  (This is the boring part.) 

Paint it like you painted your face.  Don't forget fingers! 
Once it's dry, pick at the latex a little bit, somewhere in the middle of your hand, and pull it up to reveal the skin underneath.  This will make a gaping wound, with skin peeling away.  Gross.

Like this.
Dab some black paint into the wound to give it some depth. 

You can drip or sponge on blood, as well.
Eeew! It's a fresh bite!
The fake blood that I had dried nicely after a few minutes, so I didn't have to worry too much about it rubbing off on anything I touched.  It smeared a little bit, but the blood smears seemed to accentuate the look, so I was fine with that.

Here's how one of my teens did with her hand.  It looks so gross - I love it!

A few notes on liquid latex:
1 - Always do a test patch before you apply!  I know we said that, but it's worth re-stating.
2 - It smells really bad.  Fair warning.
3 - You can use this anywhere on your body, but be careful that you don't get it into your hair If you do get it caught in your hair, it should dissolve or loosen up with oil - baby oil, olive oil, and peanut butter all work really well, much like they do with bubble gum. It takes a little while, but this does work! (I gave myself a head wound on Halloween, and ended up using the peanut butter method on my hairline and my eyebrow.  I smelled delicious.)
4 - You can use things besides toilet paper for texture.  Coffee grounds make excellent scabs, and crushed cereal gives you a flaky, falling-apart look.  Experiment and have fun!

This was a great party.  We watched two movies, ate Jell-o brains, and did our makeup.  I've also done parties with themes such as Doctor Who, Firefly, and fairies, and I have a few more planned for the future.  None of them are quite as disgusting as Zombie Day, though.

Friday, October 4, 2013

Monster Bookmarks

My, but it's been a long time since I've posted anything!  I'll have to write about things more often.  This fall, we started up an Arts and Crafts Club, to take the place of the Jewelry Club we had last school year.  Between the change from jewelry to art, and the widening of the ages to include both elementary and middle school, we have grown our club already! 

In September, we made Monster Bookmarks, the instructions to which I found posted all over the place, and with varying degrees of difficulty (though they all ended up the same).  This is how we made them here.

You will need:
 - Construction paper or other heavy paper, cut into a square (it doesn't matter what size, but we used 8x8 inch paper)
- Scissors
- Glue
- Markers or crayons to decorate with

1) Fold your paper in half and then in half again, so you have four equal squares.

2) Cut out one of the squares, leaving the remaining 3 squares connected.

4) Holding your paper like a V, cut each of the edge squares from the bottom corner to the top corner, like this:

5) Repeat on the other side, so it looks a bit like a kitty face.

6) Fold one of the triangles into the center square, then put glue on top of it.  Fold the other triangle over the first, sticking it down carefully so it lies flat.  

7) Be sure you don't get any glue under the first triangle!  It should make a pocket, like this:

 8) Use markers or crayons to decorate your monster face. If you would like to add teeth, be sure to add them to the inside of the front flap, like so...

 9) ... So they will stick over top of the page when your monster is placed in a book. 
Mmm! Pages! Nom nom nom!
You probably want to avoid decorations like googly eyes or anything else that would prevent a book's pages from lying flat when closed with the monster inside, or anything that might fall off and get stuck in a book, like glitter.

This project was super easy, despite the many steps.  The kids (ranging from 8 to 12) each made about 4 of them in half an hour; some of the kids used the square we cut out in step 3 to make smaller ones.

My next Arts & Crafts Club is on Tuesday, and I have been asked what we're making.  The truth is... I'm not sure yet!  Stay tuned!

- Miss Kat

Today, Lucky is wearing: a Geek the Library shirt and a firefighter's helmet
Our scratch-n-sniff bookmark is: Cinnamon buns

Wednesday, May 1, 2013

Harry Potter Crafts, Part 2 - Pinecone Owls

This may be my favorite craft ever.
Don't you just love this owl?  Every good wizard needs one, and luckily, they're very easy to make! 

For supplies, you will need:
A pinecone
Cotton balls
Glue
Googly eyes - in this case, larger eyes are better, because they are owls
Three small feathers
A scrap of orange paper (not pictured)
 
Miss Kat forgot about the orange paper scrap.
Pull your cotton balls apart into wispy strands, and wrap them around the pinecone, to make it look like it has some feathery bulk.  Add a little extra cotton in the face area.


Assemble your owl thusly:
Insert a feather in each side for wings, and one in the back for a tail (depending on the size of your pinecone, you may need to add a drop of glue to the ends of the feathers, so they don't fall out).  Cut a small triangle for a beak, and insert it to the face area.  Glue two googly eyes to the face.

An aerial view of the assembled bird.
That's it!  If you want to get fancy, you can cut out little feet, too.  Be careful that you don't squish his face, or he will look very sad, like my yellow one does.  (I will try to plump him up a bit.)
The Eeyore of owls.
Let me know what your owl looks like!  I hope he is as cheerful as my blue one, and not as sad as my yellow one. 

The kids loved this craft, and since it costs literally pennies to make and I had plenty of supplies, I let them make as many as they wanted (one wizard made four!).  If you make your own owls, please post a photo on our Facebook wall, so we can all share the fun!

Tuesday, April 30, 2013

Harry Potter Crafts, Part 1 - Quill Pens


We had a lot of fun at Harry Potter Day!  I had signs up with the names and crests of each of the Hogwarts school houses, and everyone got to choose which house they were in; Gryffindor had the most students.  As a patron pointed out, you aren't supposed to choose which house you're in; the Sorting Hat does that!  Sadly, I had no sorting hat, and every "which house are you in?" quiz I could find was online-only, so rather than stress over that, I let everyone pick a house. 

First thing in the morning, we made Harry Potter snacks (licorice wands, pretzel broomsticks, and butterbeer), and answered trivia questions while we enjoyed eating them.  Then, we watched the first Harry Potter movie, while devouring popcorn and lemonade.  After that, we made two Harry Potter crafts to take home. 

This is the first craft - make your own quill pens!  I got the idea from a good friend of mine who is also a librarian, so I can't take credit for the idea, much as I would like to.  It was easy and fun, and the kids loved it.

You will need:
 - Feathers - big ones.  I got a package of 20 for about $5, and they came in an assortment of rainbow colors. 
- Pens, preferably clicky ones.  I found that the stick pens had nibs that didn't come apart, where clicky pens had the inky insides that were just a stick with a nib in it, which is exactly what you need here.
- Duct tape
- Scissors


The first thing you need to do is dissemble the pen and get rid of (or set aside for another use) everything but the ink stick.  Also, cut the tip off the end of the feather, far enough that you can see the hollowness inside.

Lovely!  I also cut the pen innards until the plastic was just barely above the ink.  We don't need an inch of hollow plastic.

Now, take the ink stick, and slide it up into the feather, as far as it'll go.  If your feathers are like mine, it will go about 2/3 of the way in, and then there isn't any room for it anymore, so there will  be an inch or so if it sticking out the end, like so:


You can see where I'm going with this, I'm sure.  Cut off a piece of duct tape that's about 2 inches long, and carefully place the pen and feather onto the edge of the tape.  The idea here is to wrap the pen and feather together, so that it stays in place.  I used complementary colors (in this case, black tape on a blue feather), but some of the kids preferred to use blue penguin-patterned tape on a yellow feather, or some other highly-visible combination.  It's a matter of preference.

And, you're done!  I didn't have a scroll, so I practiced writing on a blank sheet of notebook paper.  It works!  Super easy, super cute.  I love it.
The writing says "I solemnly swear that I am up to no good."
Stay tuned for the second craft of the day.  Facebook fans of the library already know what it is!

Thursday, March 14, 2013

Jeweley Club - Washer Necklaces


The time has come for Jewelry Club tutorials again! This time, we made necklaces out of hardware - washers, to be specific.  I really liked this idea, because it's easy, cheap, and looks really neat, but it's also something that you can make without thinking too much about it, so if you want to focus on other things, like conversation or word games, you won't mess up.

To make these, you need washers - our building manager gave me a box of washers in assorted sizes, so that didn't cost us anything, but it's not expensive to get them at a hardware store, and then you can pick whichever size you like.  You'll also need embroidery floss.  I bought a 100-skein back of floss on sale, so we could all pick whichever colors we wanted. 

I find that the bigger the hole is in the washer, the easier it is to do this project, but it's not impossible to do this with smaller-holed washers, either.  To start choose your embroidery floss - I liked the ones where the colors were variegated within the skein, so it wasn't all one shade of green, but that's a personal preference.  You'll only need about half a skein of floss (at most) for this project, so you can cut that much off if you like (or use the whole thing and cut later - it takes longer and is more apt to get tangled, but then you know you have enough floss).  Tie one end of the floss to the washer, and start wrapping it around.  And around and around and around.

This one still has a long way to go.
The variegated colors end up looking something like this, with the color gradually changing from light to darker and back, but it's tricky to keep the colors from overlapping and intermixing.  Which looks pretty cool, too.

When you get to the end, tie it off with a knot before you cut off any excess floss- it's a lot easier to tie it if you have extra string left over.  You could also glue it, but that adds an element of messiness to the project that otherwise isn't there.  I'm sorry I don't have a photo of this step. 

The one with the smaller hole took much longer than the other.
One skein of embroidery floss goes a long way; I made two necklaces out of this one, and still had quite the tangle leftover afterwards.   Once you have your pendants ready, the next step is to string them. You can simply put the string through the (very handy) hole in the washer, or you can do what I did here.  I tied off a necklace-length loop of string and threaded the loop through the string.  Then I pushed the tied end through the loop, and pulled it closed - the same way you make rubber band chains.  These are a pull-over-your-head necklace, since I didn't want to sully a floss necklace with a clasp.

Ta-Da!
I thought these came out nicely, and the Club seemed to enjoy the project, though we had a little trouble with the string getting tangled.  (Luckily, this was more funny than frustrating.)  It took us at least half an hour to do each necklace, depending on how fast we wrapped the floss and how many knots we got.

Did you make one?  How did it turn out?

Lucky is wearing: A ridiculous St. Patrick's Day hat and beads
Bookmark scent: Cotton candy

Wednesday, February 27, 2013

Jeweley Club, Part 3 - Recycled Paper Beads

Kat models her recycled paper necklace.  No, she doesn't have a face.
Next up in our Jewelry Club tutorial series... Recycled Paper Beads!!!  

Recycled paper beads are super easy to make, and I think they look really cool.  You can use the beads to string a necklace (like I did for my own accessorizing) or a bracelet (like we did in Jewelry Club, due to time constraints).  That's the thing with beads; they're very versatile.

The first thing you do is to take an old magazine that you don't care about anymore - think People from last year, where all the celebrity couples have broken up already.  Pick pages that have colors that you like, and rip them out.  (You can also use old books - I had success with a copy of Eragon that was literally falling apart and wasn't readable anymore.)   

Using a paper cutter (or scissors, but a cutter is much easier), cut your chosen pages into very long (the length of the longer side of the page) triangles.  I tried to keep the width of the triangle at around 1/4", but the size is up to you; the size of the wide edge of the triangle is the size of the bead.
(Does that make sense?)
 
Paper strips to start out with.
Now that you have paper strips cut, it's time to roll up some beads!  You can roll your beads around anything from toothpicks to pencils, but I have found that lollipop sticks are the perfect size for making beads.  (Also, you get a snack afterwards.) 

Start by choosing which side of the paper you want to see, and face that side away from the lollipop stick.  Hold the wider edge of the triangle against the stick and start to wind it around, as tightly as you can. (Don't glue it down, or you won't be able to get it off!)
We're on a roll!
Roll the paper tightly around itself, trying to keep the paper as centered on itself as possible (which makes the bead even).  Once you have about 1/4" of paper left unrolled, add a dab of glue (white glue and glue sticks both work well), and continue to roll.  Sometimes you have to try the glue a couple times (especially if the paper is very glossy), and you may get sticky fingers, but this will secure your bead. 
Pro-tip: Don't eat the lollipop until after you're done making beads, or things can get rather sticky.
Gently pull the glued-shut bead off the lollipop stick.  It should slide right off the end.
Ta-da!
And now you have beads!  I used mine with hemp string and a regular old jewelry clasp to make a necklace, but whatever your preferred method of beading is should work.

Just a warning: these beads are not waterproof, so make sure you don't forget and wear your necklace in the shower, or at the beach!  You can make the beads waterproof by using Mod-Podge or clear varnish, but this takes a long time to dry and can get very messy, so we didn't do that.

This just wraps up the Jewelry Club projects that we've made so far, but be sure to check back in March to see the instructions for the next project!

Today, Lucky is wearing: Gryffindor scarf
Scratch and sniff bookmark scent: honey

Jewelry Club, Part 2 - Beaded Bracelets

The finished product.
Next up in our overview of Jewelry Club projects: beaded bracelets!  Double-strand beaded bracelets, to be exact.  What makes them a double-strand? As you can see here, there are two strands of little beads (seed beads), connected by larger beads.  I found the idea for these in a book, where they were called "kandi bracelets," but looking up that phrase online tells you that kandi bracelets are beaded bracelets that you make and trade with your friends, and don't have to be this specific kind of bracelet, so here are the instructions to make the ones we made in Jewelry Club.

First, make a plain old beaded bracelet.  You'll want to cut a piece of jewelry cord (or string, or wire) that's long enough to wrap very loosely around your wrist twice - remember, too long of a string is better than not enough, since you can always cut the end off!  Start by tying one large bead (the "anchor bead") to the end of the cord, and then start adding beads.  The pattern is easy: one large bead, six small (seed) beads.  Repeat this to make a bracelet that wraps comfortably around your wrist.  Here's mine:

That looks very long, but it fit me perfectly.
When you have your bracelet the right size, thread your jewelry cord back through the first bead (the anchor bead).  It should make a completely closed circle.

Make sure it fits before moving on to the next step!
Then, start your pattern again.  Thread six seed beads onto your cord, but instead of adding a large bead, thread your string back through the first large bead on your bracelet, like this:

Big beads are shared by both strands of little beads, because sharing is caring.
Continue this pattern as before, threading 6 seed beads onto your cord before putting the cord through the next big bead in line.  This pattern should continue all the way around the bracelet, until it has two strings of beads all the way around, like this:

I love the purple band-aid, don't you?  Don't worry; it was just a paper cut.
Once you've gotten all the way around the bracelet,  thread your cord through the anchor bead one more time and tie it off as tightly as you can.  And you're done!

Beautiful!

Saturday, February 16, 2013

Jewelry Club, Part 1 - Duct Tape Bracelets

We've been having a lot of fun with Jewelry Club here at the library, and we've already made 3 awesome projects.  The problem is, not everybody can come to every club, and sometimes you just can't remember how it was that you made that bracelet.  To remedy this, I've decided that we're going to post instructions on the blog, with step-by-step photos of how to make each of the projects we're working on.  First up: Duct Tape Bracelets!

This is a really easy, fun project, and the one that I get the most questions about.  That's probably because, while it's very easy, there are several steps to it.  To start with, you need duct tape, which now comes in a plethora of colors and designs.  You can use one color or multiple ones; for this tutorial, I used 3 colors, just to make it easier to see what I was doing. Once you choose your colors, you want to cut off a strip that's about 8 inches long from each color (you need three strips total).  Here, we have my strips, hanging off the edge of my desk.  Lovely!

After you have all your tape strips ready, place them (one at a time) sticky-side up on your work surface, and fold over about 1/3 of the strip horizontally - I find it easiest to start sticking it down in the middle, which keeps it mostly even without giving you wrinkles.  Fold each strip over onto itself, so that it makes one solid 8-inch-long strip of tape that is no longer sticky.  Don't worry if it's not perfect - mine here weren't even in width all the way down, and the white one had a huge crease in it, but you can't tell in the finished bracelet.


Now that you have 3 tape pieces, take another piece of duct tape, about 3 inches long - whichever color you want to be the bottom of the bracelet - and tape all your tape strips to the table, and we can start braiding!


From here, you have two options:  You can either braid where your tape strips each have a top side, and you keep that top side on top, like I did here: 


Or you can fold the strips over-top of each other as you go, making a flatter, less lumpy bracelet, like I did here:


I personally like the Top-Side Method, because I liked that it gave texture to the bracelet, and it also curved inward a little bit as I braided, which made wrapping it around my wrist a lot easier.  Yes, it looks a little lumpy as you're braiding, but the finished result is what you're going for.  It's a personal preference thing.  I think the girls at Jewelry Club liked the Folding Method better.

Once you have braided your tape - as tightly as you can! - it's time for the tricky part.  It's easier if you have a second set of hands to help with this:  Take the entire braid and the tape off the table, being careful not to unstick it from the tape that was stuck to the table.  Then, wrap the braid around your wrist to make sure it fits, and tape it together to make it the size you want it, using the tape that you had used to secure the braid to the table in the first place.

Confusing?  Here is me holding the bracelet together with my thumb to the correct size (it's difficult to tape it together when it's on your own wrist, or even on somebody else's wrist - you may have to make sure it's the right size and then tape it in the open air).


I then took that tape and wrapped it around both ends of the braid to secure it into a loop.  The braid is now a bracelet, with a bottom part where the two ends are held together. 


And now you're done!

It looks a lot more complicated than it is; the girls at Jewelry Club each made 4-5 bracelets in the hour that we were there, including the time for instruction and the time to pick out tape colors. 

If you're interested in making bracelets or other projects with duct tape, be sure to check out the Duck Tape brand's Ducktivities website at http://duckbrand.com/duck-tape-club/ducktivities for lots of ideas!

I'll write more about Jewelry Club soon.  I still have a few projects yet to teach you!