Tuesday, August 26, 2014

All About George

"Make sure you get my good side."
Who is George?
In short, George is the library frog.  He's an African Dwarf Frog who lives in a tank on the bookshelf next to my desk in the children's room of the library.

How We Got Him
The library was lucky enough to be able to adopt a pet this past spring. I (Miss Kat) had been talking to my assistant (Miss Shannon) about possibly getting a fish or a gerbil or something.  "How would you feel about a frog?" she asked, and called her mother right then.  Shannon's mother was the proud owner of George, an African Dwarf Frog, with whom she had lived for 9 years. (Nine years!) Unfortunately, poor George was often being terrorized by the cats, who were trying to get into his tank. The poor little guy was stressed out, and was invited here to live at the library.
No cats here! High five!
George and his mother are still on good terms, of course; she follows him on Twitter so she can keep up with his active social life.  (You can follow him, too! His handle is @LibraryFroggy .)
Biology and Such
George is an African Dwarf Frog. He's very little - smaller than he looks in photographs.
The camera adds 10 ounces.
His body is only about an inch and a half long - this isn't counting his legs, which are probably another inch and a half long on their own.  African Dwarf Frogs, George included, live their whole lives underwater. They have lungs and breathe air - they don't have gills like fish do - so they need to swim to the top of the water and take a breath every 10 minutes or so. They do need to be underwater, though; their skin is delicate, and can dry out really quickly.
Yes, George can understand English, though he doesn't have the vocal chords to speak. He also doesn't have teeth or eyelids. He eats frog pellets, which come in a jar that looks like fish food. (According to my research, he could also eat frozen bloodworms, but I'm not excited about that idea.)
ADFs live for an average of 5 years, but can live for up to 20 years! We are celebrating George's 10th birthday on September 6, which puts him right in the middle.  We hope he has a long and happy life ahead of him.

Hobbies and Interests
George loves singing. When it's really quiet (and usually later in the day, but not always), you can sometimes hear George's song, which sounds like a little tiny zipper being zipped.  "Zeep! Zeep! Zeep!"  It's a happy noise, and he has been known to sing when he's happy. He's also an avid reader, and usually has an opinion on just about any book he's read, though it's not always easy for him to articulate it.
If he was in Hogwarts, he'd be a Hufflepuff.
He's a really good listener, and will often swim up to the glass on the tank if you sit down to join him for a bit. (Not always, though - ADFs can sleep up to 12 hours a day, and might snooze through your visit.) George is also a history buff, and enjoys celebrating the anniversaries of famous events.  Here he is honoring the Apollo 11 astronauts and their successful moon landing. 
"That's one small step for George, one giant leap for mankind."
All in all, George is a pretty cool guy.  Do you have any questions that I didn't answer?

Thursday, August 21, 2014

Fall 2014 Events

Fall is just about upon us (at least, when it comes to planning programs) and I'm sure that after a summer of thrilling blog entries and arts & crafts tutorials, you're all clamoring for more information about what we're doing at the library. So, here's what's coming up:

We will start being open on Saturdays again in September, and I've decided that the first Saturday of the fall will be George's birthday. For those of you who haven't had the pleasure of meeting him, George is the frog that lives in the kids' room of the library, on my bookshelf.  He's an African Dwarf Frog that belonged to a friend of our's (actually Miss Shannon's mom) for nine years (!) before he came to live with us a few months ago. Given that he wasn't a tadpole when she got him, we can safely assume he was at least few months old by then, so we may not be too far off on the birthday that we assigned him. Officially, he will be 10 years old on September 6.
Isn't he handsome?
To celebrate George's birthday, we're having an Ice Cream Party, where you can make your own sundaes. (To be honest, we did this last year, anyway, but this year we have a good reason to celebrate.) I am working on frog-themed decorations.  I could write a whole post about George, and maybe I will at some point. In the meantime, you can follow him on Twitter to see what he's up to (no, really - @LibraryFroggy). 

We're trying to do a party each month, just for the fun of it. On the calendar are the Despicable Me Party, a Pirate & Princess Party, and a Holiday Gift Wrap Party (where we watch movies and wrap presents and drink cocoa and feel festive and alive). Those are far enough away that I'm not working too much on them just yet, though.

Right now, I'm in the planning stages for the Fall Crafts event (the first of this school year's monthly Arts & Crafts Club meetings).  Last year, we did one craft per month, but I'm being a bit more ambitious this time around, and I'm going to attempt to have materials for 2 or 3 different crafts each month.  These will mostly be made with stuff we already have or that doesn't cost a lot, so we can watch our budget... Also, they're easier to duplicate at home if it's not all from a kit. I always felt like doing from-a-kit crafts was somehow cheating, anyway.

I'll post the instructions online later, but here are a couple of the Fall Craft samples I made: 
Whooooooo would make an owl out of a toilet paper roll?
You may be sensing a theme here.  Owls out of cupcake liners, and owls out of felt and puffballs (in the actual craft, I'm hoping to use acorns instead). The third craft, however, will be making foxes out of leaves, so if you thought it would be another owl... looks like I out-foxed you! (Hahaha, I kill me.)

Also new this fall: We are revamping storytime! What used to be "Baby Lapsit" is now "Baby Time" (since that's what I always called it anyhow), and I'm going to do my best to add in more nursery rhymes and finger plays. Even more exciting, what has been "Toddler Time" for years and years is now "Story Adventures"! Miss Shannon will be doing more books, bigger crafts, and the whole thing will be on a brand new day! That's right: due to many conflicts of scheduling with other storytimes and toddler- or preschool-aged activities available locally, we have switched storytime to Thursday mornings! This may not seem like big news to most people, but it's very exciting to us! I hope we get off to a running start.

The Tween Book Worm Book Club is still meeting twice a month; they have chosen books to read through February. Nothing new there, but it's always a good time. 

Other than that... business as usual. Maybe once school starts, it can slow down enough here that I can get my desk cleaned off (what are the odds?).

Wednesday, August 20, 2014

Summer Reading Overview

The 2014 Summer Reading Program (Fizz, Boom, Read!) has come to a close, after just under 6 weeks. We had a few setbacks - budget cuts led to us eliminating a few programs and weekly summer reading prizes, and we were closed for an entire week.  Even so, I think this summer was a great success!

THANK YOU!
First off, the thank yous. Fizz, Boom, Read (as well as Spark a Reaction and Literary Elements) was sponsored by the Lawrence Library, the Massachusetts Library System, the Boston Bruins, and the Massachusetts Board of Library Commissioners. Because we have no budget for programs, all of the summer's activities were funded by the Friends of the Lawrence Library. The Tidepool Adaptations program from the New England Aquarium, the Mouse Trap Science program with Jungle Jim, and the visit from the Blue Star Planetarium were supported by grants by the Pepperell Cultural, a local agency, which is supported by the Massachusetts Cultural Council, a state agency. This year, we were lucky enough to get Summer Reading prizes donated by Chipotle, the Topsfield Fair, the PawSox, Roll On America, and the Rob Compagna Guitar School in West Groton, MA. Thank you! We are extremely grateful.

Participation & Books Read
This year, we had tons of sign-ups for the program - possibly due in part to getting a free meal at Chipotle when you signed up, but I'd like to pretend it's because reading is so awesome.  102 kids signed up! We taped an outline of a beaker (excuse me - it's actually a flask) on the wall, and asked the kids to help us fill it up by earning stars.  One star was awarded for each one chapter book or five picture books read.  Here's the wall at the end of the summer:

According to my binder, this is 597 picture books and 172 chapter books! Way to go, everyone!!

Programs
SO MANY PROGRAMS. We started off with our annual Bubble Blast, which Miss Shannon has taken charge of for the last several years - it's always a good time.  For kids, we had weekly "Make It And Take It" crafts, which could be either made at the library or taken and completed at home, as well as weekly "Science Adventures," which included stories and science activities for kids from preschool to early elementary age.  We had an MIT astrophysicist bring his solar telescopes so that we could look at the surface of the sun.  Jungle Jim performed a Mouse Trap Science program, which taught us about simple machines while using balloons (and I got to be the mouse in the mouse trap!). The Blue Star Planetarium was here and gave us tours of the night sky, and the New England Aquarium brought their traveling tide pool. Rolling Video Games of NH joined us to play video games on the front lawn.

We also had arts and crafts: the DIY YA series (Do It Yourself, Young Adult) found us making book safes, duct tape wallets, galaxy t-shirts, mini book necklaces, and homemade lip balm. We also made tie-dye shirts at Miss Tina's annual Tie Dye Party, and had two major movie parties: one for Doctor Who, and one for Star Wars. (The instructions for and information about many of these programs were posted on this blog in the past few weeks).
Lucky shows off his tie-dye.
All told, we had 1013 people attend our children's programs and 216 attend our teen programs. Not too bad for less than 6 weeks!

I know I had a great time this summer, and I hope you all did, too.  Now: let's get started on Summer 2015!

Tuesday, August 19, 2014

Star Wars Party

Lucky dressed up to promote the party. He's Boba Fetch.
The Star Wars Party was our very last event of the 2014 Summer Reading Program. I can't believe it!  This summer went by super fast, and I'll write an overview of it later this week, but for now, let's focus on the party.

I decided a while back that I needed to have a Star Wars event, and since this summer's theme was science, science fiction fit in perfectly.  We watched one of the movies (the one that used to be the first one but is now the fourth), had some snacks, and played a game.

Snacks
Wookiee Cookiees and Vader-Ade
I always go way too overboard on this stuff, but since this was only a short event, I managed to rein myself in. We had Wookiee Cookiees (yes, that is how you spell "wookiee") and Vader-Ade (lemonade mixed with iced tea). As with the Doctor Who Party, I printed out cute little signs for the refreshments; please note that I didn't make the signs for Vader-Ade or for the Wookiee Cookiees. I found them using a Google image search. I wish I could take credit for the amazing artwork, but I can't.

Things I was going to do but stopped myself: Jabba Jigglers (green jell-o); Yoda Soda; pretzel-stick lightsabers. Also, for the Wookiee Cookiees, I was going to use a gingerbread man cutter and cut out a bunch of gingerbread cookies with fork-tine-marks for fur, and have little frosting bandoliers... yeah, see? Overboard. We had gingersnaps from a bag, and nobody cared.

Lightsabers
Yes, you can have yellow lightsabers. Also purple or silver.
After sitting and watching a movie and eating sugary food, I figured we needed a way to burn off some steam. I found this idea online, and had some of my kid-friends help me make them. We took pool noodles, cut them in thirds, and wrapped one end with duct tape. Then, we drew on buttons and lines with markers. At the party, I blew up a bunch of balloons, and told the kids to try to keep them from hitting the ground. Most kids just attacked each other, but they're pool noodles, so after trying unsuccessfully to stop the violence, I decided the parents could intervene if they were worried (they weren't), and instead spent my time blowing up balloons and trying to keep the kids from running into the parking lot.
The battle ensues.
Decorations
In addition to the two full-size cardboard Darth Vader standees that we own (each of which was pointing the way to the party), we had posters for each of the original trilogy, framed and on the sidelines.

We also had a cardboard standee that I made and painted, which isn't perfect, but will do just fine. Notes: Luke had both a blue and a green lightsaber, depending on the movie, but DID NOT wear his Tattooine outfit when he fought Darth Vader. I was aware of this (believe it or not) but thought it would look better than an all-black outfit, since the Tattooine outfit is more iconic. Yes, the kids noticed.


That's about it, really. We had 63 people (quite the crowd), and everyone seemed to enjoy themselves. A good end to a good summer reading program.

Friday, August 8, 2014

DIY YA: Duct Tape Wallets


It's so cool, it had to be on the diagonal
Today was the last session of this summer's DIY YA crafts, and we did a classic: the duct tape wallet. Before we get to the instructions, let me give you a few notes:
- DIY YA stands for "Do It Yourself, Young Adult." I note this mostly because I've gotten questions, but also because this particular craft is hard to do with younger kids, since there is a lot of cutting, and you need really sharp scissors - the dull, kid-safe ones literally just won't cut it (I amuse myself so much sometimes).

- Also, this project can be really frustrating, because the tape sticks to itself and to you, and the table, and anything else that happens to be in the way, so make sure you have a good sense or humor going into it.

- And! Just to avoid confusion, I want to mention that the generic name for the particular kind of tape we're using is DUCT tape; that is, tape for fixing heating ducts. DUCK tape is a brand name of the tape, which comes in a plethora of colors and patterns.  As I am not going to insist that you use any particular brand, I will be using the term "duct tape" in this instructional.

You will need:
- Duct tape in whatever colors you like
- A ruler

Step One: Making the body of the wallet
Make yourself a solid sheet of duct tape that measures at least 8" by 6" (we're going to trim it down, so it doesn't need to be exact at this point).

I have found the easiest way is: first, lay out the duct tape sticky-side up. You will need about 4 tape strips, overlapping slightly at the top and bottom edges. Start with the color that you want the inside of your wallet to be.
The inside of my wallet is white, which in hindsight
was a bad choice for a photographic tutorial.
Then, using the color that you want the outside of your wallet to be, cover the tape sheet with new strips of tape, sticky side down. If you've done it correctly, sticky-side to sticky-side, you shouldn't have any sticky bits.
Inside: white. Outside: blue and sparkly.
Trim your tape sheet to the correct dimensions. I made and cut out a pattern before we began, but you can just as easily measure and cut on the spot.

NOTE: It's a good idea to reinforce the edges of your wallet at this time, so they don't fray later.  (I forgot to do this and had to go back and do it later).  Use the outside wallet color or an accent color to tape the longer edges of the tape sheet, folding it over so seal it together.

Step Two: Folding and taping
Fold your wallet in half hot-dog-ways, so that it measures 8" by 3".  Carefully tape the seam on one side of the wallet with the outside color/accent color of your wallet. Be careful not to tape the TOP of the wallet, since you need that open to put money in.
One side carefully taped shut.
 Then, continue on the other side.  Your wallet should now look like an envelope without a flap.
Or a shiny, blue canoe. Note the sealed top edge of the inside pocket!
Step Three: Making the crease
Fold your new billfold in half, and press down along the crease.  Now, sit on your wallet while you complete the next step.

Step Four: Making card pockets
If you want pockets to put cards in, now is the time to make them! Create a flat sheet of duct tape (as in Step One) that measures 3.5" by 3.75".  Fold it not-quite halfway over, short edge to short edge; this will make two pockets, one peeking out from behind the other.  Make this crease very strong,

Step Five: Securing the card pockets
Get the wallet out from under your bum and unfold it.  Position the new pocket on one half of the wallet (the part that is inside when it's folded up). This part is tricky to explain:  Carefully unfold your new pocket, and, using the same color tape as you have for the outside of the wallet, carefully tape the upper portion (the part above the fold) of the outside edge of the pocket to the edge of the wallet, wrapping the tape around the edge to secure it.  Then, tape the inside edge of the top part of the pocket to the middle of the wallet (shown here in white).
I know this step is confusing, but trust me.
The inside of the pockets here is white.
I hope that made sense, because I can't figure out a better way to describe it.
Fold up the pocket again, and tape the outside edge of the pocket to the outside edge of the wallet, wrapping around the end to secure; repeat with the inside edge.
Repeat by adding a pocket to the other side of the wallet, if desired.

Step Six: More tape
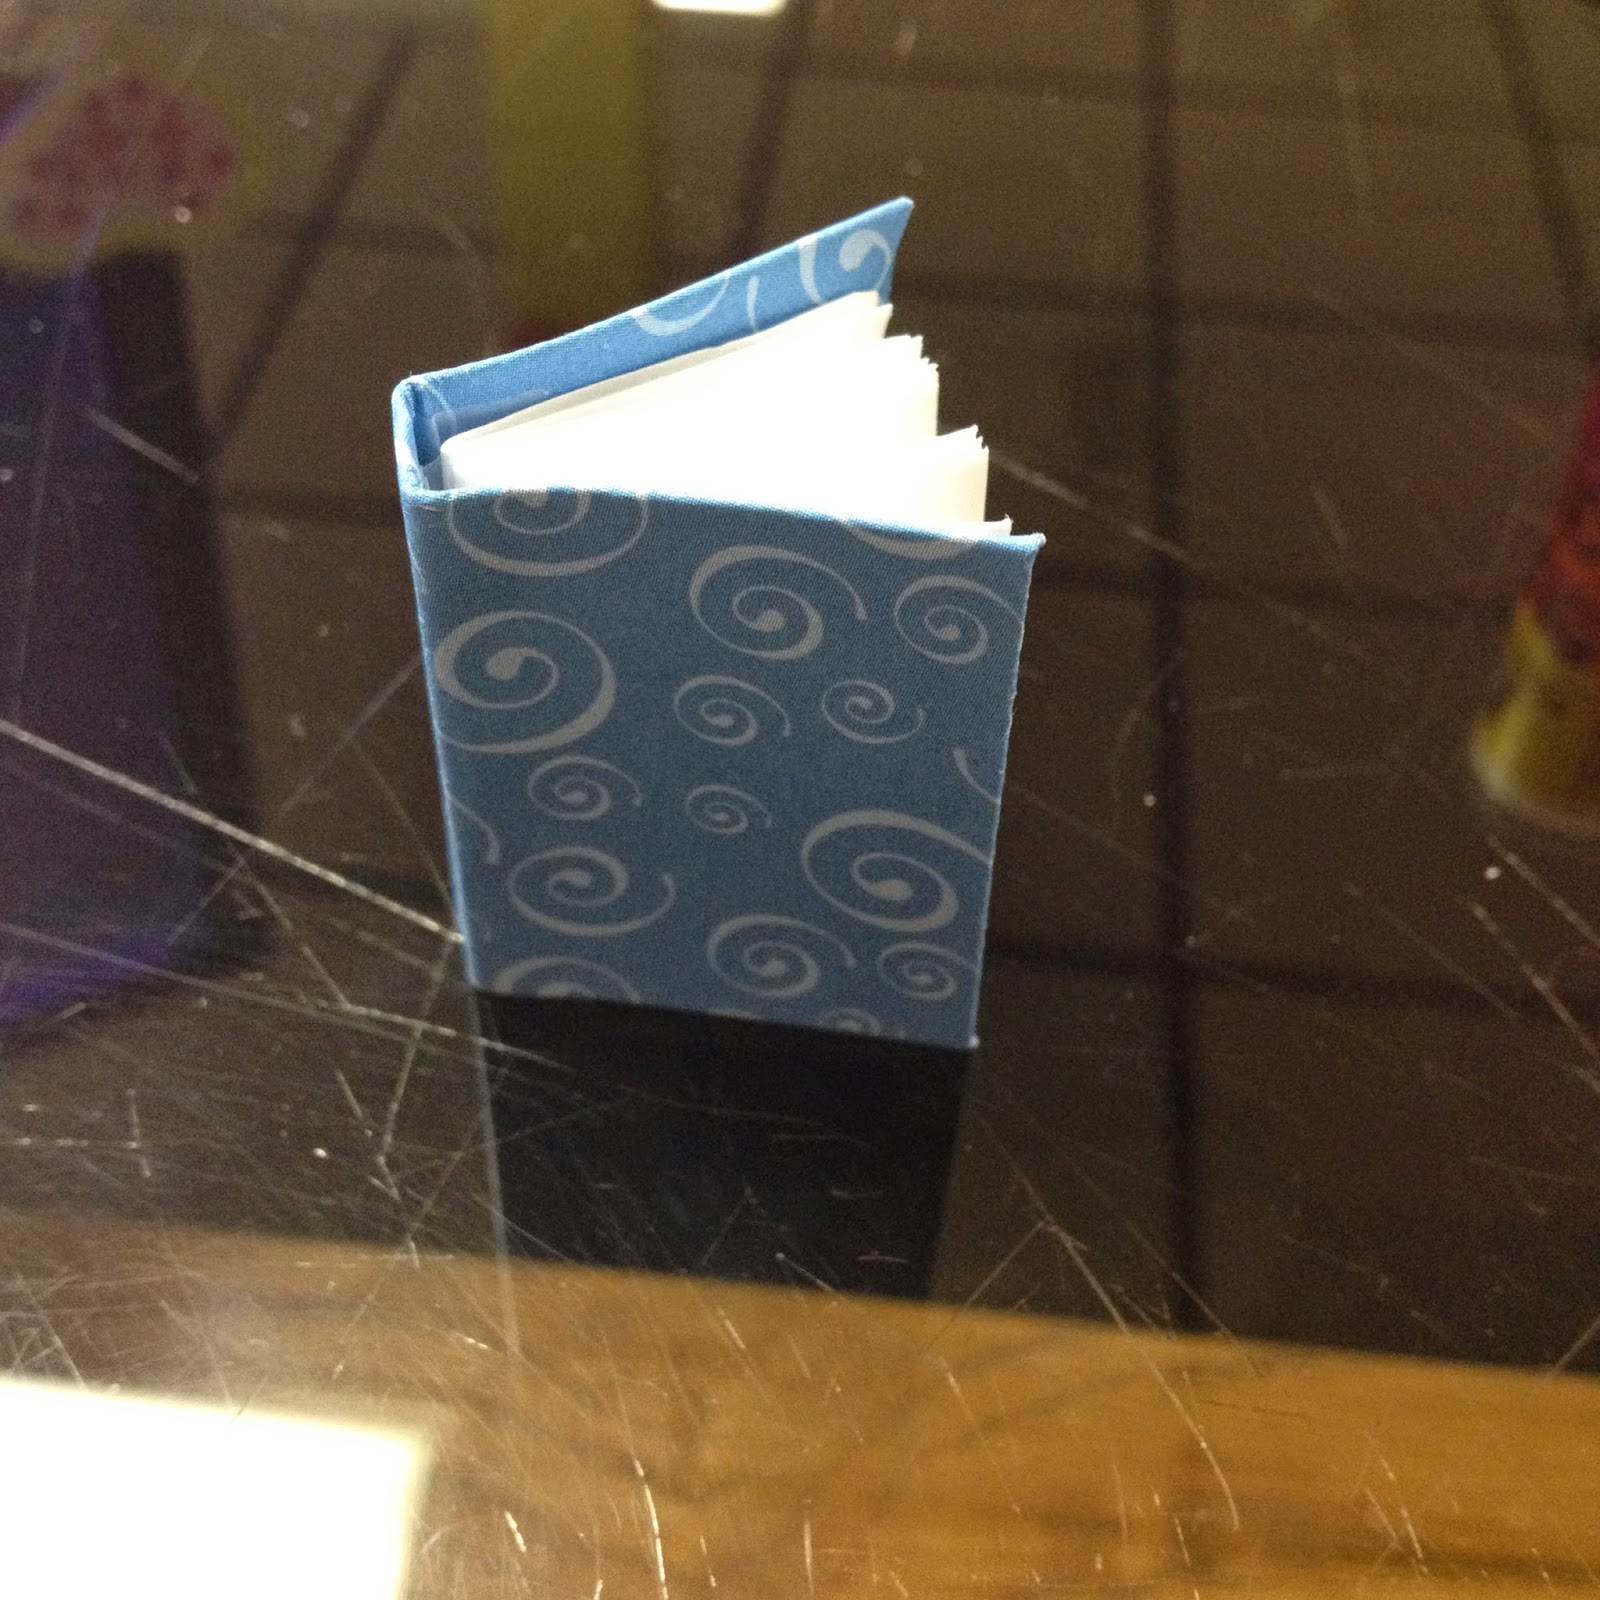
Last step, I promise.  Tape the bottom edge of your new pockets to the bottom of the wallet, wrapping around the end to secure.  (If you skip this step, something can fall out of the top pocket, since nothing will be holding it in place.)
Lovely!
Congratulations! You're done!

I hope this tutorial wasn't too confusing.  Please let me know if anything wasn't clear, and I will do my best to clarify - I can take photos with different colors of tape, or put arrows where the steps are, or maybe some sort of interpretive dance?

Enjoy your wallet.  Let me know how it turns out!

Wednesday, August 6, 2014

Doctor Who, Redux

I just realized that I didn't put up the Doctor Who Party information from our latest party.  Here's the scoop:
David Tennant always leads the way.
Firstly, I think it was very helpful that, between the last event and this one, I managed to get myself completely hooked on this show, so I understood the fandom and was better able to serve my fellow geeks.

Unlike last time, when I did a full-day (10 am to 4 pm) Doctor Who program, I decided to do a 2-hour party.  It was much less work, and we still got a huge crowd!  Here are the numbers:
Last time: 6 hours                       This time: 2 hours
Last time: Saturday                     This time: Friday afternoon
Last time: 6 episodes                  This time: 1 episode
Last time: 42 attendees               This time: 39 attendees

The first time I did a DW event, I vastly under-estimated the amount of people who would be interested. I made a cake (decorated with a Cyberman head), which was gone by noon, and ended up sending someone for more popcorn; all-told, we went through 13 bags of microwave popcorn, countless pitchers of lemonade, and everyone was still clamoring for food at the end.  And I was tired and grouchy and overwhelmed.

This time, I planned ahead. We had themed snacks: jelly babies (gummy bears), TARDIS lemonade (it was blue), Adipose cookies, and fish fingers with custard (vanilla pudding and gummy fish).  It was a huge hit.  We still ran out, but we didn't run out until the very end, and everyone was happy and really enjoyed the snacks.
Adipose cookies
The Adipose cookies were very easy.  It was regular sugar cookie dough from a mix, and then I assembled them on the baking sheet (before baking) according to this highly scientific diagram:
For reference, this is what an Adipose
looks like in the show. They are literally
little blobs of fat with faces.
Fairly self-explainatory


I added the chocolate chip eyes after I took them out of the oven, but I'm not sure it matters.  I also made witty little signs for each of the snacks.

We also had two crafts. We decorated TARDIS keys.  The husband of one of my coworkers works for a car dealership, and he gave us a box of old key blanks that were no longer in use, and we decorated them with glitter (to make them look more space-like, or something). That was easy and fun.

Oooo.... spacey.
We also made bow-ties for shirts or hair bows, which I detailed in a previous post, and we had (like last time) our stand-up TARDIS made out of a folding partition.  We got permission to make it into a permanent TARDIS, so I attacked it with the hot glue gun, lots of felt, and a little bit of paint. I'm not sure I didn't like the paper one better, but at least we don't have to assemble it every time now.

We also have the TARDIS that's been painted on our elevator door for a while now,
Why erase a beautiful thing?
and I made a cardboard Dalek.  Originally, it was supposed to be a standee that you can put your face through and take a photo, but I liked it too much to cut a hole in it, so we just let him be a decoration and scare people who dared to turn the corner. 
EXTERMINATE!
The episode we watched was "The Day of the Doctor," which was the special 50th anniversary episode of the show, for those not in the know.  (I know... 50 years! I have so much catching up to do!) I had expected that some people would watch while others ate snacks and/or did crafts, but I was wrong. Everyone - to a person - sat and watched the show, and then ate snacks and did crafts. Apparently it was too awesome of an episode to distract yourself from.

OH! We also had "pin the face on Lady Cassandra." In the show, Lady Cassandra is the last human alive, but she's had so much plastic surgery that she ends up looking like a flat piece of pizza dough with a face. 
"Moisturize me! Moisturize me!"
I made that shape out of paper and taped it to the wall, then made a bunch of faces that could be stuck on. For some baffling reason, I don't have a photo of that.  I'm sure you can figure it out.  I had also intended to write out "Bad Wolf" on the floor with tape, but I forgot until it was too late.

All in all, it was an amazing program, and a fantastic day.  Lots of prep work, but totally worth it.  People came in costume - bow ties, TARDIS hats and dresses and messenger bags, long colorful scarves... No weeping angels this time, though.  

Would I do it again? Yes, in a heartbeat. Maybe not with Lady Cassandra this time, unless she was just up for decoration.  Honestly, though: I used to be ashamed to be a geek, and I would hide it when I'd get excited about all the weird stuff (that is: not girly, not cool, not socially acceptable... like sci-fi and fantasy books, and Star Trek, and historical fiction, and musical theater) that I liked. But not anymore! I embrace it, and celebrate it, and I am not alone! There are lots of us... and we have awesome parties.

Friday, August 1, 2014

DIY YA: Book Necklaces

I didn't realize it was backwards. Whoops.
Our next foray into wearable art is the book necklace. I made a sample over a month ago, and I very often get comments when I wear it (usually, "where did you get that?"). It isn't hard to make one of your own, but there are several steps involved.  Here's how:

You Will Need:
* One sheet of plain, white paper (printer paper works)
* Card stock or thin cardboard (NOTE: I used white card stock for this project this time, because I had several sheets on hand, but I have done this before with a cereal box; because we are covering the book, it doesn't matter if there is a pattern on the cardboard or not.)
* Colored or patterned paper, for the book cover
* Scissors, tape, glue, ruler
* Necklace string
* Clasps (optional)
* Thumbtack or needle, to make a hole for the string
Not pictured: string, because I forgot it until after I took the photo.
Step One: Folding
- Fold the white paper in half from top to bottom, and cut along the fold.
- Take one of the half-sheets and fold it in half, and in half again, and again, and again.  You want 16 small rectangles.

Step Two: Cutting
- Cut out the rectangles; you will need 12 for this project. You can recycle the other 4, or use them for bookmarks.

Step Three: More Folding and Stapling
- Group the paper into 4 groups of 3 rectangles each.
- Fold each group in half, and staple along the crease. You should have 4 small paper books.
In progress.
Step Four: Taping
- Tape two of the stapled bundles together at the spines; repeat with the other two.
- Tape all four of the little books into one big book.


Step Five: Card Stock
- Set the pages aside and measure out a cover for your book out of card stock.  I found that it worked best if it measured 2.75" x 1.5". When we did this project at the library, I had all the covers pre-cut, so we didn't have to fuss with rulers and pencils and such.
(Why? It needs to be slightly taller than your pages are tall, and a long enough to cover both front and back of the little book, plus room for a spine. Because our little book is roughly 1.25" tall by 1" wide, this seemed to fit well.)
I know you're all jealous of my Woody the Owl ruler, but I'm not selling it.
Step Six: Making a Spine
- Before adding patterned paper, I folded my little book cover around the pages, pressing down to make a nice square spine. This step is optional, but I find that it makes it easier to put together in the end.

Sometimes it helps to see it, not just read it.
Step Seven: Adding Patterned Paper
- Cut a piece of patterned paper that's slightly bigger than your book cover.  I found it easiest to lie my card stock on the wrong side of the patterned paper, then drawing a rectangle around it, making sure to leave 1/4" or so of room for glue.
- Glue the card stock to the blank side of the paper, and then cut off the corners.

Step Eight: More Tape
- Tape down the patterned paper on all four sides, then re-crease the card stock to make it into a book shape again.

- Make a bubble of tape and apply it to the inside of the book cover, on the spine. Press the pages into the tape and hold tightly. You now have an adorable little book!
It's so cute!!
Step Nine: Making a Necklace
- Take a needle or a thumbtack and make a hole toward the top of the spine of your book. Wiggle it around until it's big enough to thread some string through. (Alternately, you can use a jump ring, but I didn't have any of those on hand.)
- Thread a string through the book spine, and cut it to the appropriate length.  Either you can tie your string ends and slip the necklace over your head, or you can add a clasp.

Enjoy!
Miss Kat's Notes:
- Yes, this is held together with mostly tape, but I've had mine for over a month and it hasn't fallen apart yet. I assume you could glue it, but I haven't had the need.
- If you are using cardboard with a pattern on it that you don't want to see, be sure to glue that side of the cardboard to the paper, thus hiding the Trix Rabbit.
- You could get really fancy and print out or draw a tiny copy of your favorite book cover and use that to cover the card stock. I found that I enjoy having a generic book, rather than a specific one, but it's up to you.

Thursday, July 31, 2014

DIY YA: Galaxy Shirts

This project is easy. Like, really easy. Deceptively easy. Even though it looks hard enough that people have asked, "do you really think I'll be able to do that?" (The answer is, of course, yes.)
Here's a close-up of my finished shirt. You can't tell me it isn't awesome, since that would be a lie.
You will need:
* One black t-shirt for each participant
* A spray bottle with a mix of bleach and water (I used half bleach and half water, but it's up to you)
* Fabric paint in various colors, including white (I have seen this done with acrylic paint, but haven't tried it)
* Brushes, sponges, and paper plates to mix paints
* A toothbrush or other small brush (optional, but recommended)

Step One: Preparation
Take your ordinary, boring black shirt, and give it a spritz with bleach solution, making sure to get both front and back of the shirt.  I found it helped to get some areas wetter than others, so you have a pattern of light spots on your shirt, which will be the background of your galaxy.  Let the shirt dry completely - I prepared our shirts the day before painting.  (Optional step: wash and dry your shirt; this keeps the bleach from eating away too much of the fabric.) Be careful not to get any bleach on yourself! I did this outside on the lawn, so we didn't get bleach all over the carpet.

The bleach with react with a black shirt to make it orangey-gray, depending on how much bleach you use.
 Step Two: Painting
Lie your shirt flat on the grass, sidewalk, or other flat-ish surface. (You can put cardboard inside the shirt if you like, but I found that not using cardboard gave the paint more depth, since it wasn't all flat.)  Mix up whatever colors of paint you'd like on your shirt.  We had red, light blue, dark blue, yellow, and glow-in-the-dark, which we mixed to make lovely greens, purples, oranges, and such.

Step Three: Background
Using a brush or sponge, dab paint VERY LIGHTLY on your shirt. You can always paint more, but you can't take paint off, so you want to use a very light touch and paint multiple coats, until you get the colors that you want.  (At least, that's what I did.  One of my teens used a heavier hand, and her shirt looks AMAZING.)
It looks better in person, I swear.
Step Four: Stars
When you have the colors how you want them to be, you can use a small brush or toothbrush to flick small drops of white onto your shirt, for stars. I was able to find white paint in a spray bottle, so we used that instead of flicking paint, which can be messy.
I'm afraid it's hard to see in this photo, but the white stars DO make a difference.
Step Five: After painting
Let your shirt dry for 72 hours, and then turn your shirt inside-out and tumble-dry in your clothes dryer to help the paint set.  Then, wash and wear as desired.
Ta-da! Here's my torso in my finished shirt.