It's been a while since I updated our blog. Shame on me! Now that the holidays (and the accompanying illnesses, vacations, and stresses) are over, life at the library is starting to settle back to normal.
Of course, normality is relative. Our on-going schedule for every month includes two tween book clubs, two YA book clubs, Lego Club, Arts & Crafts Club, 3 different story times (and a Community Helpers Storytime), and a Saturday night movie.
This doesn't include our special events, of which we have many coming up: Frosty the Snowman's Birthday Party, movie days, a visit from iRobot, a Superhero Party, a library Open House, and Geek Con, which includes a writing contest, a video contest, and art from local artists, as well as cartooning classes and other stuff - I could (and should) write a whole blog entry about that.
There have been a few other changes, too. We got a new bookcase in the children's room, which is over with the toys. One side of the bookcase has board books for little ones, and the other side has parenting books and magazines. The parenting books had been next to the beginning readers, but now we have more room for the beginning readers to grow, and the parenting books are in a more logical area. Right now, I'm working on updating the signs to let people know where their books are.
I'm also working on a new project to highlight the nonfiction books. We'll see how it goes!

Friday, January 17, 2014
Friday, November 8, 2013
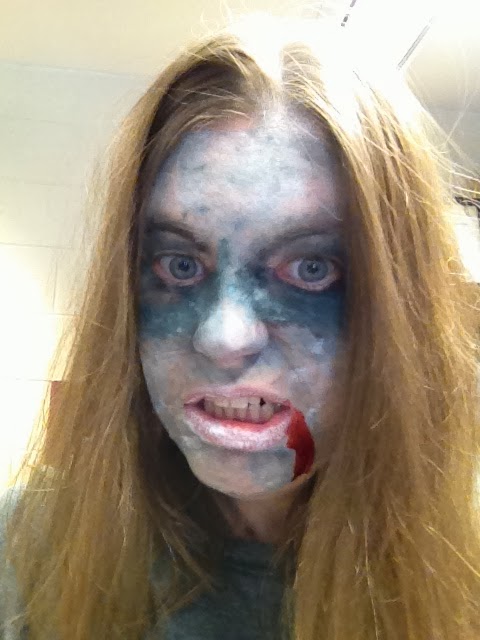
So You Want to Be a Zombie
 |
| BRAAAAAAAINS! |
So! In case you missed Zombie Day, or have heard about it and wish you could have been there, I've drawn up a quick tutorial on how to turn yourself into a zombie. I'm using my own face and hands as a tutorial, so please forgive the zombie selfie photos.
First, the supplies:

To apply a glamorous undead look, first mix up some makeup. Using mostly white, with dabs of green and black, make a lovely disgusting color. I found that it looked more realistic if the makeup was somewhat mottled, so try to not mix it all the way, and give it a marbleized look.

Give yourself a nice, even coating of a pale, sickly color, anywhere you would like to apply makeup - face, hands, knees if they stick through the holes in your jeans, whatever. Try to get at least part of your neck, or else the makeup will look just like a mask.
 |
| Yes, this is me. Don't I look excited?! |
Next, add a bit more green and black to your makeup to make a darker color, and dab it around your eyes, to make them look sunken in. Solid colors and absolute shapes aren't necessary - no realistic zombie would have a perfect circle of black around their eyes.

 | ||
| Same photo as above, I know. |
The first thing you do - ALWAYS - is a test patch. Put a little bit of latex on your hand or somewhere else that's easy to wash off, and make sure that you're not itching or burning. If it dries and you are uncomfortable, DO NOT USE THE LATEX! You might be allergic! Even if you've never been allergic to latex before, it is always a good idea to test any new product to see how it makes you feel, just in case. If you can't use latex, you can follow the rest of the directions using school glue; it won't be exactly the same, but it'll be similar.
Once you've tested, it's time to get started! First, pick where you would like the wound to be.

Add a layer of liquid latex to your hand (or wherever), and then add some toilet paper to the top of it. You can scrunch it up or lay it relatively flat (as I did here). Put more latex on top of the toilet paper, until the whole thing is wet, and make sure it's evenly stuck to you on all sides.
 |
| The red is fake blood. Fake, I swear! |
Paint it like you painted your face. Don't forget fingers!

 | |
| Like this. |

You can drip or sponge on blood, as well.
 |
| Eeew! It's a fresh bite! |
Here's how one of my teens did with her hand. It looks so gross - I love it!

A few notes on liquid latex:
1 - Always do a test patch before you apply! I know we said that, but it's worth re-stating.
2 - It smells really bad. Fair warning.
3 - You can use this anywhere on your body, but be careful that you don't get it into your hair. If you do get it caught in your hair, it should dissolve or loosen up with oil - baby oil, olive oil, and peanut butter all work really well, much like they do with bubble gum. It takes a little while, but this does work! (I gave myself a head wound on Halloween, and ended up using the peanut butter method on my hairline and my eyebrow. I smelled delicious.)
4 - You can use things besides toilet paper for texture. Coffee grounds make excellent scabs, and crushed cereal gives you a flaky, falling-apart look. Experiment and have fun!
This was a great party. We watched two movies, ate Jell-o brains, and did our makeup. I've also done parties with themes such as Doctor Who, Firefly, and fairies, and I have a few more planned for the future. None of them are quite as disgusting as Zombie Day, though.
Friday, October 4, 2013
Monster Bookmarks

In September, we made Monster Bookmarks, the instructions to which I found posted all over the place, and with varying degrees of difficulty (though they all ended up the same). This is how we made them here.
You will need:
- Construction paper or other heavy paper, cut into a square (it doesn't matter what size, but we used 8x8 inch paper)
- Scissors
- Glue
- Markers or crayons to decorate with

1) Fold your paper in half and then in half again, so you have four equal squares.

2) Cut out one of the squares, leaving the remaining 3 squares connected.

4) Holding your paper like a V, cut each of the edge squares from the bottom corner to the top corner, like this:

5) Repeat on the other side, so it looks a bit like a kitty face.

6) Fold one of the triangles into the center square, then put glue on top of it. Fold the other triangle over the first, sticking it down carefully so it lies flat.

7) Be sure you don't get any glue under the first triangle! It should make a pocket, like this:

8) Use markers or crayons to decorate your monster face. If you would like to add teeth, be sure to add them to the inside of the front flap, like so...

9) ... So they will stick over top of the page when your monster is placed in a book.
 |
| Mmm! Pages! Nom nom nom! |
This project was super easy, despite the many steps. The kids (ranging from 8 to 12) each made about 4 of them in half an hour; some of the kids used the square we cut out in step 3 to make smaller ones.
My next Arts & Crafts Club is on Tuesday, and I have been asked what we're making. The truth is... I'm not sure yet! Stay tuned!
- Miss Kat
Today, Lucky is wearing: a Geek the Library shirt and a firefighter's helmet
Our scratch-n-sniff bookmark is: Cinnamon buns
Wednesday, May 1, 2013
Harry Potter Crafts, Part 2 - Pinecone Owls
 |
| This may be my favorite craft ever. |
For supplies, you will need:
A pinecone
Cotton balls
Glue
Googly eyes - in this case, larger eyes are better, because they are owls
Three small feathers
A scrap of orange paper (not pictured)
 |
| Miss Kat forgot about the orange paper scrap. |

Assemble your owl thusly:
Insert a feather in each side for wings, and one in the back for a tail (depending on the size of your pinecone, you may need to add a drop of glue to the ends of the feathers, so they don't fall out). Cut a small triangle for a beak, and insert it to the face area. Glue two googly eyes to the face.
 |
| An aerial view of the assembled bird. |
 |
| The Eeyore of owls. |
The kids loved this craft, and since it costs literally pennies to make and I had plenty of supplies, I let them make as many as they wanted (one wizard made four!). If you make your own owls, please post a photo on our Facebook wall, so we can all share the fun!
Tuesday, April 30, 2013
Harry Potter Crafts, Part 1 - Quill Pens
We had a lot of fun at Harry Potter Day! I had signs up with the names and crests of each of the Hogwarts school houses, and everyone got to choose which house they were in; Gryffindor had the most students. As a patron pointed out, you aren't supposed to choose which house you're in; the Sorting Hat does that! Sadly, I had no sorting hat, and every "which house are you in?" quiz I could find was online-only, so rather than stress over that, I let everyone pick a house.
First thing in the morning, we made Harry Potter snacks (licorice wands, pretzel broomsticks, and butterbeer), and answered trivia questions while we enjoyed eating them. Then, we watched the first Harry Potter movie, while devouring popcorn and lemonade. After that, we made two Harry Potter crafts to take home.
This is the first craft - make your own quill pens! I got the idea from a good friend of mine who is also a librarian, so I can't take credit for the idea, much as I would like to. It was easy and fun, and the kids loved it.
You will need:
- Feathers - big ones. I got a package of 20 for about $5, and they came in an assortment of rainbow colors.
- Pens, preferably clicky ones. I found that the stick pens had nibs that didn't come apart, where clicky pens had the inky insides that were just a stick with a nib in it, which is exactly what you need here.
- Duct tape
- Scissors

The first thing you need to do is dissemble the pen and get rid of (or set aside for another use) everything but the ink stick. Also, cut the tip off the end of the feather, far enough that you can see the hollowness inside.

Now, take the ink stick, and slide it up into the feather, as far as it'll go. If your feathers are like mine, it will go about 2/3 of the way in, and then there isn't any room for it anymore, so there will be an inch or so if it sticking out the end, like so:

You can see where I'm going with this, I'm sure. Cut off a piece of duct tape that's about 2 inches long, and carefully place the pen and feather onto the edge of the tape. The idea here is to wrap the pen and feather together, so that it stays in place. I used complementary colors (in this case, black tape on a blue feather), but some of the kids preferred to use blue penguin-patterned tape on a yellow feather, or some other highly-visible combination. It's a matter of preference.
And, you're done! I didn't have a scroll, so I practiced writing on a blank sheet of notebook paper. It works! Super easy, super cute. I love it.
 |
| The writing says "I solemnly swear that I am up to no good." |
Subscribe to:
Posts (Atom)